

- Half Life Alyx Character Guide: The Only Character Guide You’ll Need - May 24, 2022
- Painting VR Review: The Mad Science of Painting - May 20, 2022
- Cities VR Review - May 10, 2022
Compound VR is a rogue-lite shooter available for PCVR. It is a game that has you sneaking from the sewers of the titular Compound, tearing your way through its many goons worthy of a supervillain, and hunting down the villainous CEO. This guide will lead you through unlocking its many unique weapons, understanding the enemies that appear on each map, and taking out all the bosses that stand before you and that helicopter the cowardly CEO uses to fly his spies.
You may find yourself dying a lot in this Compound’s halls, even on the easy difficulty. Don’t fret, though; that is the essence of a rogue-lite. Every death is a new experience from which to learn. We may have peppered the digital reaper in curses, but we still must learn from those fatal mistakes to move forward.

Bottom Line Up Front
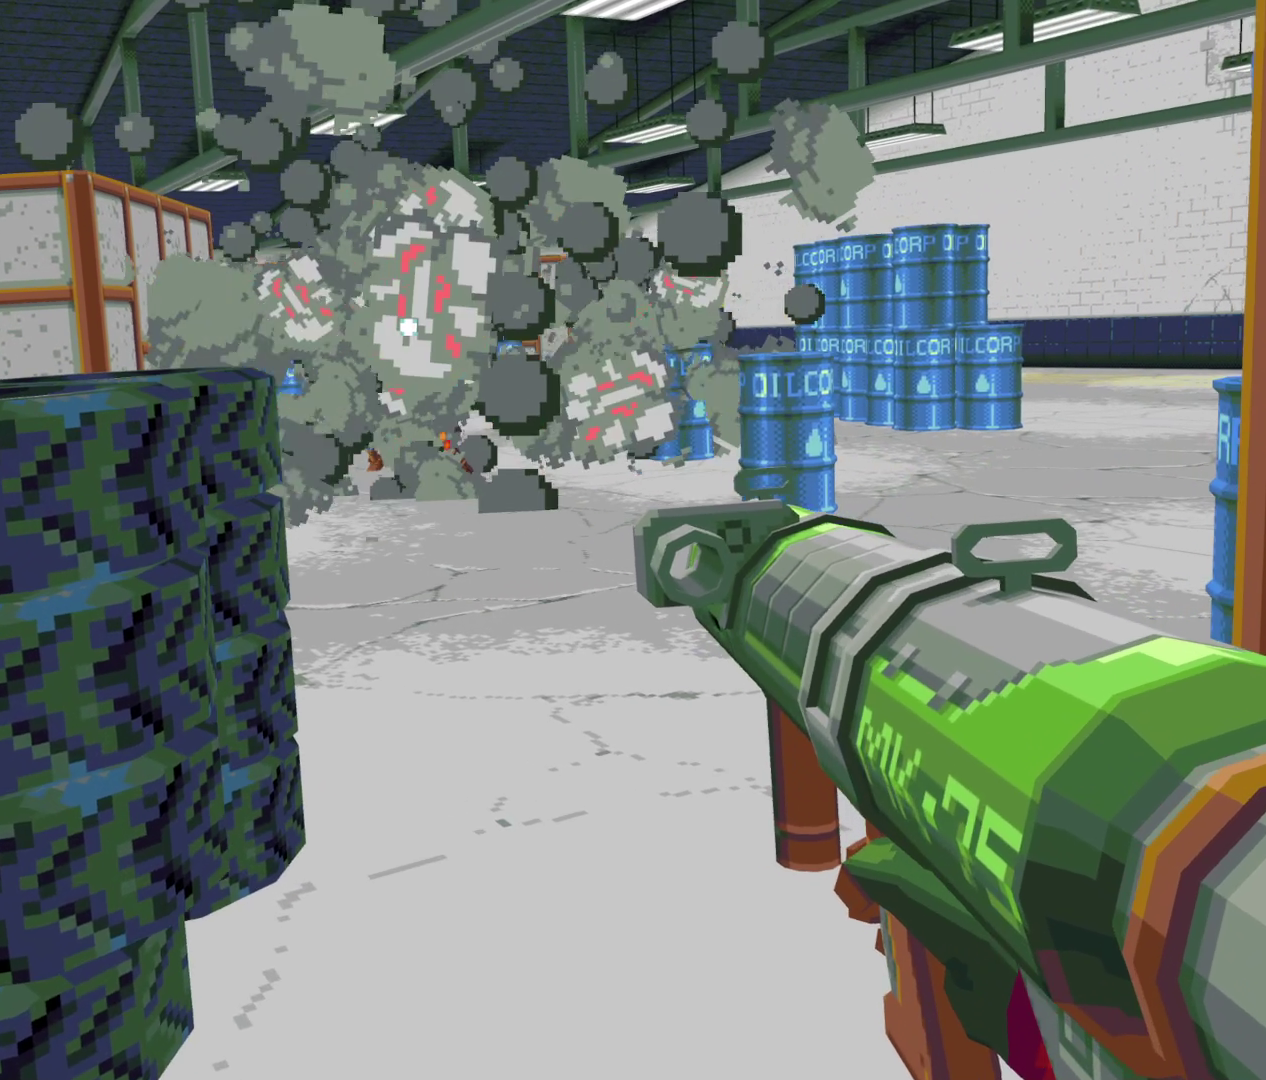
- Bullets fly flowers in this game. Think Bullet-Hell bullet physics. This means ducking and weaving is your best chance for survival.
- Kill the drones first.
- Use the emergency pistols found on the walls. 300 total kills with them will unlock the Compound Bow mutation.
- Dual-wielding might be possible, but I only advise using two emergency pistols of differing types. Two of the same type will share an ammo source, and all other gun types require the off-hand to reload.
- If dual-wielding, resist the urge and only use two weapons (unless using the old school mutator). The third will require dropping that weapon to pick up loot and, most importantly, to reload.
- Some bosses can only be found on higher difficulties.
- The typical run’s level order: Underground Sewers, Reception & Sales, Vaccine Warehouse, Profit Management (Boss), Chemical Processing (Boss), Research & Development (Boss), Executive Power, High Worth Individual (Boss).
- Each level has two floors with the exception of High Worth Individual. If indicated with (Boss), the level includes a boss on the second floor.
- The plasma Pistol and an SMG or Assault Rifle combo are recommended for beginners.
- Mutations such as Old Schooler or COmpound Bow can make things easier or more fun.
Unlocks
GUNS
| Weapon | Mag Size | Color | Unlock Condition |
| Plasma Pistol | Overload | Blue | Unlocked from Beginning |
| Blast Pistol | 3 | Blue | Kill 30 Drones |
| Laser Pistol | 3 | Blue | Kill 50 Elite Guards |
| SMG | 14 | Pink | Unlocked from Beginning |
| Assault Rifle | 30 | Pink | Kill 50 Guards |
| Revolver | 6 | Pink | Kill Dr. A. Moral 3 times. |
| Double Barrel Shotgun | 2 | Red | Unlocked from Beginning |
| Bouncer Shotgun | 5 | Red | Kill the Accountant 5 times |
| Dart Gun | 7 | Red | Beat the game with the Damage Amplifier Mutator Once |
| Rail Gun | 4 | Orange | Unlocked from Beginning |
| Laser Rifle | Charged | Orange | Kill 30 Stalkers |
| Sonic Pulse Generator | 9 | Orange | Obtain a silver Trophy on Every Non-Boss Enemy Type. |
| Grenade Launcher | 1 | Green | Unlocked from Beginning |
| Rocket Launcher | 1 | Green | Kill 30 security bots |
| Sticky Launcher | 3 | Green | Kill 25 Kami bots |
MUTATORS
| Mutator | Unlock Conditions | Modifiers |
| Old Schooler | Unlocked from Beginning |
|
| Extra Arms | Unlocked from Beginning |
|
| People Populator | Unlocked from Beginning |
|
| Chaos Compound | Beat the game 3 times. |
|
| Damage Amplifier | Die 10 times |
|
| Gun Magnet | Unlock all weapons |
|
| Compound Bow | Total 300 kills with blue weapons |
|
Difficulty Modes

Each difficulty mode will increase the difficulty of enemies, add bosses to certain levels, and lower your health. On Easy, you will have five health points, Medium four, and on the Hard difficulty, three. Your chances of finding health items seem to be higher the lower the difficulty you play on.
General Gear

Map

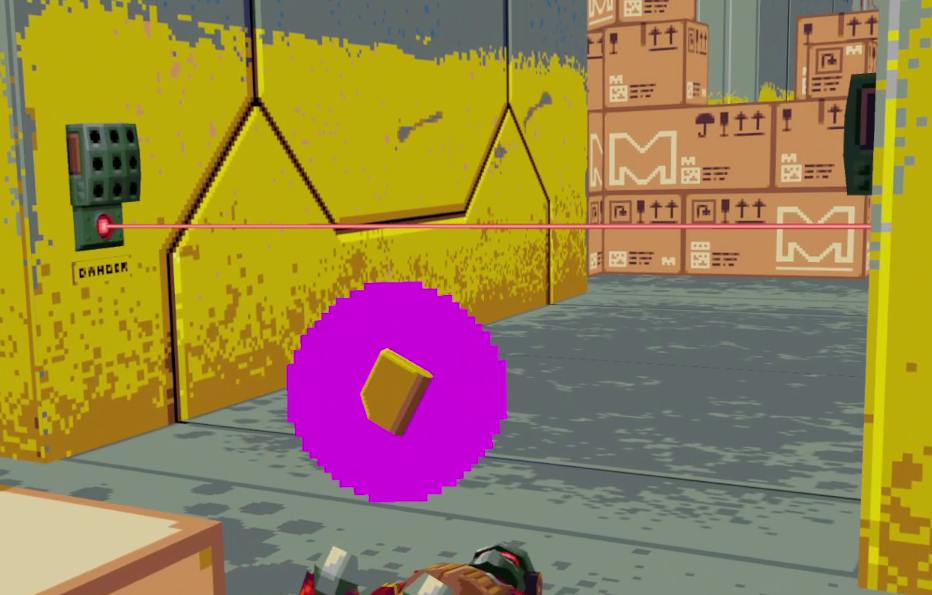
Your map can be accessed by looking at either wrist. You will see the map of the floor you are on, your current health, and the number of magazines you are carrying for each color-type of weapon.
The mp will show your path by turning the portion you have walked on the green. In addition, weapon drops will be indicated on the map with white hollow circles. Ammo with filled-in colored circles, food will appear as a burger icon, and bosses will appear as an open red circle.
When you have cleared a room of enemies, you will be able to teleport to that room by clicking the hollow green circle that appeared in that room. When you have only a few enemies or one room of enemies left, an arrow will appear on the player indicator showing the direction of the nearest enemy.
Food & Drink
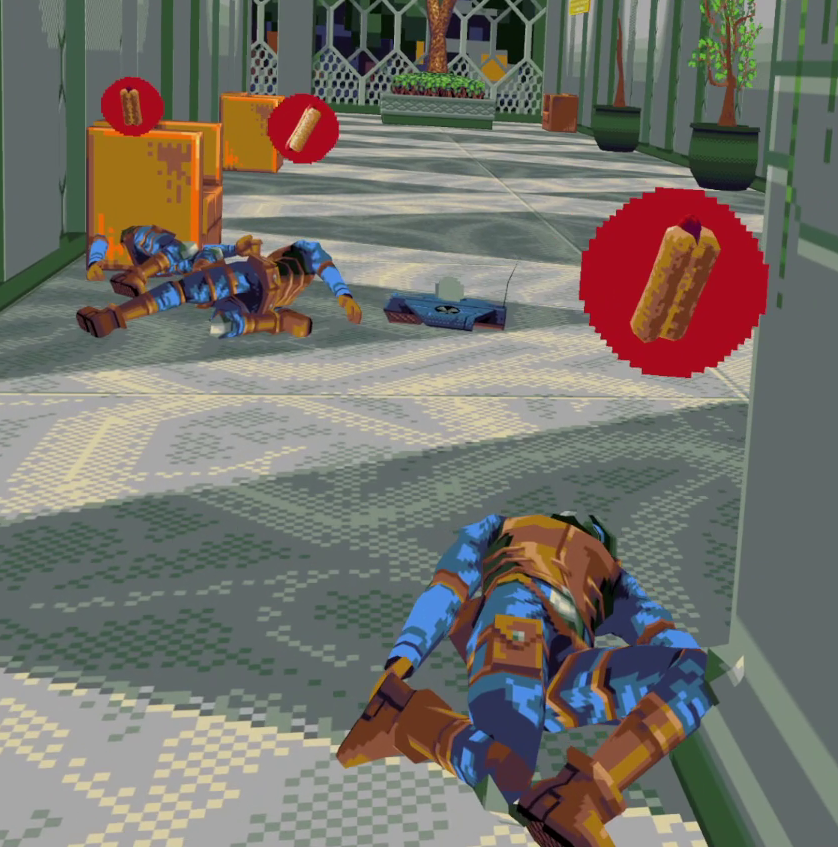
Your one and only health items. Food can be scarce but will not vanish so long as you are on that floor. Food and drink are both used by bringing them to your mouth. Each one only heals you for one health point. Enemies will drop these health items randomly upon death.
If you stumble across them while in full health, can turn the tide of battle later on when mixed with teleporting around the map for leftover rations. However, if you have a single health point missing, use it immediately.
Helmets

A helmet acts as a temporary extra health point. This loot will rapidly disappear once it is dropped, so make a bee-line for it should the path be safe, as it would be silly to lose two health points to gain a temporary one. The helmet will be removed when you enter the elevator and go to the next floor.
Free Reload

Free Reload will allow you to pull magazines from your inventory without removing them from your stock. This effect will only last for a brief window. Like the helmet, free reload will disappear quickly if not picked up. This loot is useless if you have the pistols but can be incredibly useful at the correct times.
Should you stumble across it as a firefight winds down, quickly reload your guns even if one bullet is missing. A free reload is a free reload. So if you stumble across it during a firefight, use it to unload on an enemy with your favorite weapon while rapidly reloading until the yellow haze indicating its presence vanishes.
Ammunition

Ammunition is shared between weapons based on their color type. Accordingly, you will be able to tell what kind of ammunition a gun uses based on the color of the weapon’s body. While the magazine shape will appear based on which gun you have in your inventory, including switching between two of the same color type. Upon grabbing it and releasing any ammunition found will immediately be added to that color’s magazine count.
Compound’s Gun Collection

Except for specific mutations, three guns can be held on you at all times, though the third gun is ill-advised as it will require you to release it to pick up loot and reload. You will be able to switch between your holstered weapon by pressing the upper face button (Y/B) of either empty hand.
A gun will release its magazine automatically once empty. Furthermore, pressing grip with an open hand will immediately summon a magazine of that color type to you, allowing it to be released. Once you load the magazine, the gun will need to be primed by pressing the bottom face button (X/A) of the hand holding the gun. A gun can also have its magazine pre-released by hitting the bottom face button (x/a) with a magazine loaded.
Further information on guns can be seen on the screen in the shooting range. Both the shooting range and practice ranges are perfect ways to get a handle on a new weapon once you unlock it. Even the otherwise mutation-only bow!
Blue Weapons
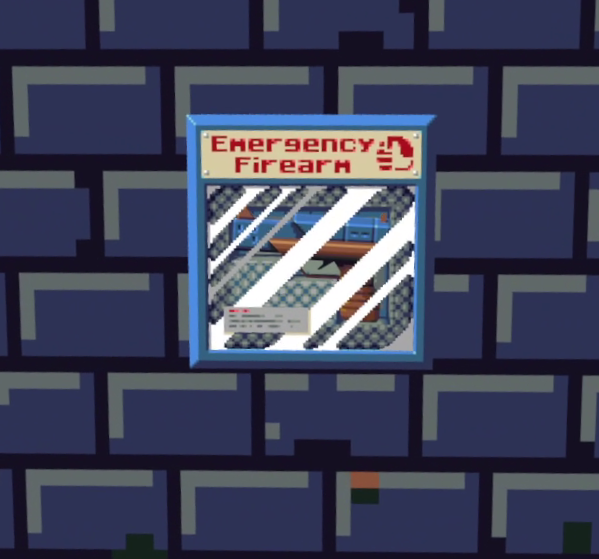
Emergency Pistols will be found in glass cases all around the compound. Every level will have them somewhere, just in case you run out of ammunition. You will start with the traditional plasma pistol. Still, as you unlock the other two styles, they will randomly appear in the various emergency-gun cases.
The pistols have unlimited ammunition, but each has a different form of recharge time mentioned below. Please note that it is ill-advised to dual-wield the same type of pistol as they will share the same heat-sink.
Plasma Pistol
Unlock: Unlocked at Start
Magazine Size: Overheats on overuse.

A plasma pistol acts similar to your standard automatic pistole. The butt of the plasma pistol will indicate how close it is to over-heating. Relax your trigger finger for a second, and it will cool down.
Blast Pistol
Unlock: Kill 30 Drones
Magazine Size: 3

The blast pistol fires like a shotgun, but it has a far shorter range than either the shotgun and especially the pistol. You are granted three shots before it needs to reload, but pressing the bottom face button will force it to reload early.
Laser Pistol
Unlock: Kill 50 Elite Guards.
Magazine Size: 3

Like the blast pistol, you get three charges. However, unlike the blast pistol, your ammunition will rapidly recharge should you slow your firing down. Multiple shots can be made on one charge should you shoot slowly, but rapidly firing them will deplete all three rounds. Furthermore, the recharge will be slower should the laser pistol be completely exhausted.
Pink Weapons
SMG
Unlock: Unlocked at Start
Magazine Size: 14

Until you unlock the Assault Rifle, this will be your best friend during early runs. The SMG has about half the magazine capacity, and its accuracy is terrible. However, it is excellent in the early runs for clearing a hallway. Once you get used to its erratic accuracy, switch to it when dealing with a powerful enemy or a large group of enemies and just ran out of ammo.
Assault Rifle
Unlock: Kill 50 Guards
Magazine Size: 30

This one is my favorite. Against enemies or bosses, it can be a tried and true favorite. It has, in my opinion, the best sight of any of the guns and is easy to learn to hip fire as you handle it. Its large magazine size and tight accuracy mean that you should nearly always pick up this weapon if you see it in your runs. Its sight means you can pick off drones and heads from across even the most extended hallways.
Revolver
Unlock: Kill Dr. A. Moral 3 times.
Magazine Size: 6

Red Weapons
Double Barrel Shotgun
Unlock: Unlocked From Beginning
Magazine Size: 2
While helpful if you have no other alternatives, it is only perfect for clearing groups. As well as quickly unloading it into a powerful enemy before switching to another weapon you have saved. It is powerful at close range and suitable for picking off groups of drones at medium range. Still, its low ammo capacity coupled with how slow reloading it shot by shot can be when it is far from my first choice in the middle of a firefight.
Bouncer Shotgun
Unlock: Kill the Accountant 5 times
Magazine Size: 5

The bouncer shotgun is a vast improvement over the double-barrel not only due to its increased mag capacity; but also thanks to its ability to bounce its burst shot off of a surface once. This can make dealing with enemies while hiding around cover ten times easier.
Dart Gun
Unlock: Beat the Game with the Damage Amplifier mutator active.
Magazine Size: 7

Its unlock condition might be challenging, but it is worth it. The Dart Gun does not have a cone blast like the previous red weapons. Instead, it will fire up to seven shots as long as you hold the trigger. The fire rate is slow enough that dragging this gun across a hallway has a high chance of multiple headshots with a quick enough aim.
Orange Weapons
Rail Gun
Unlock: Unlocked From Beginning
Magazine Size: 4

The Rail Gun is a beast. It can take down even a rocket stalker with only a couple of shots and nearly destroy the account’s shield with an entire 4 round magazine. While it has a low ammo capacity, it is quick to reload and easy to aim.
The rail gun has the added ability to cleave through multiple enemies with a single so long as they are in its path.
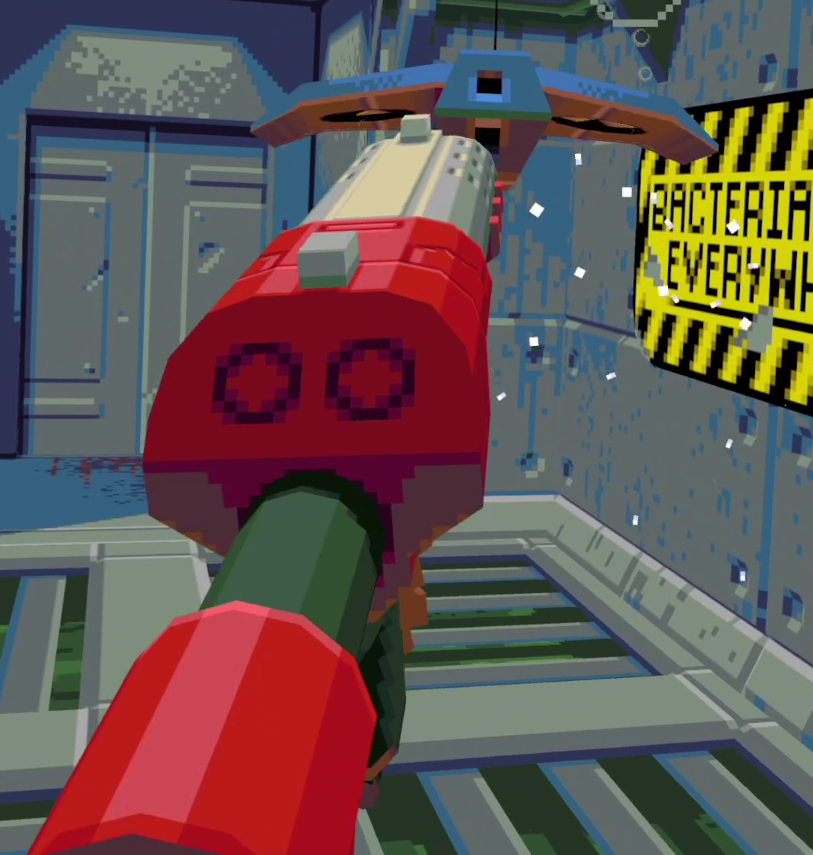
Laser Rifle
Unlock: Kill 30 Stalkers
Magazine Size: Once charged, it rapid-fires beams, which will drain your battery based on how long you hold the trigger after it is set.
The Laser Rifle is best kept in your back pocket until dealing with a boss or an enemy you consider beefy and rugged. Unlike other guns, the Laser Rifle has to be charged for seconds before it unleashes a barrage of lasers. The problem is that it will only charge and release while you hold down the trigger. You can use this to get one massive bombardment out of a magazine or 3 to 4 tinier bursts on more problematic to kill enemies like the Stalkers.
Sonic Pulse Generator
Unlock: Silver trophy on every non-boss enemy type.
Magazine Size: 9

This gun won’t do any initial damage; its power lies in countering. Firing its pulse against an enemy’s projectile will deflect it back on them and empower it with more energy, allowing for a stronger counterstrike. Of course, you still will have to aim it based on the bullet’s new projectile based on your reflection.
Green Weapons
Grenade Launcher
Unlock: Unlocked From Beginning
Magazine Size: 1

The grenade launcher will launch a single grenade, which will bounce once on a surface. It will either explode immediately upon hitting an enemy or within a couple of seconds once it hits a surface a second time.
This is the last gun I pick up unless it appears when I don’t have an open space. Generally, I just used different pistols instead. Primarily due to my tendency to forget about the bounce and miss, or most often, accidentally hit something that is just within the blast radius.
Rocket Launcher
Unlock: Kill 30 Security Bots
Magazine Size: 1
The rocket launcher functions similarly to its grenade lobbing cousin, but it doesn’t bounce on impact. Instead, the rocket will just explode where ever it hits. This is a better choice than the grenade launcher but weaker than the next green gun.
Sticky Grenade Launcher
Unlock: Kill 25 Kami Bots
Magazine Size: 3

Three rounds to spare and the ability to stick them to whatever surface or enemy you want. The sticky grenade should be your aim long before you unlock the rocket launcher. However, the game does prefer to throw security bots are you rather than Kami Bots.
The sticky grenades will not explode on impact. Instead, they require you to trigger them using the bottom face button (X/A). Should a sticky bomb be placed, the button with trigger it. Should no sticky grenades be on the field, you will just reload as usual.
Mutations

Mutations will adjust certain aspects of your run until you remove them using the shower found next to the mutation’s vending machine.
Mutations can be used on all difficulties, though the effects may not be as beneficial to the bosses as you might expect. Modifications like Old Schooler and Compound bow can help rank up specific enemy kill trophies or see that elusive sewer rat meet his skittering, vomiting end.
You can use mutations after you unlock them by selecting them from the vending machine found near the HQ’s elevator, then injecting yourself with them. They can be removed using the shower right next to the vendor.
Old Schooler
Unlock: Unlocked From Beginning
- Carry up to 16 guns
- Move Faster
- More Ammo
- Auto Pickup Ammo & Health
- Way More Enemies
- Faster Enemy Bullets
Extra Arms
Unlock: Unlocked From Beginning
- Weapons Auto-reload
- Not as fast as a manual reload.
People Populator
Unlock: Unlocked From Beginning
- Enemies have less HP
- Faster Bullets
- More Enemies
Chaos Compound
Unlock: Beat the game 3 times.
- Random Floor Order
- Random Loadout Per Floor
- Random Enemies Per Floor
Damage Amplifier
Unlock: Die 10 times
- All enemies die with one shot.
- You die with one shot.

Gun Magnet
Unlock: Unlock All Weapons
- Enemies Drop Weapons
- No Ammo Drops / Reloads
Compound Bow
Unlock: Total 300 kills with blue weapons.
- Replaces weapons with a bow.
Almost all guards and other enemies will be downed with one shot, while beefer enemies will take a couple more. To succeed, remember to set an anchor point. Your anchor point is where you will constantly pull your arrow upon notching it. Find where you are most comfortable and where you can see the compound bow’s reticle consistently.
A bow will not require reloading, but you will have to ready the arrow by notching the bowstring back with each fire. Your firing rate is up to how well you manage your bow.
Pressing the bottom face button (X/A) while handling the bow will allow you to switch between your regular arrows and the slowly recharging bomb arrows.
Levels
Order: Underground Sewers, Reception & Sales, Vaccine Warehouse, Profit Management, Chemical Processing, Research & Development, Executive Power, High Worth Individual.

Each level has two floors with the exception of the top floor, which houses the final boss. To open up the elevator to proceed up to the next floor, you have to clear the level of enemies. Each level will gradually add more enemies or enemy types. The Sewers, Warehouse, and Executive Levels all have bosses at higher difficulties. The Warehouse on medium, and the Sewers and Executive levels on hard.
After beating the C.E.O. Helicopter and exiting that level, the game will return you to the Underground Sewers; only Loop 1 (or the number loop you are on) will appear. Your difficulty will have been increased, and a new run will start.
You can save your progress in a run by pulling the level next to the elevator. You still have to beat the level and leave through the elevator. This will leave you in the headquarters, with your next trip in the elevator taking you to your last save. This only lasts until your subsequent death in that save.
Level-Exclusive Enemies
Level-Exclusive enemies do not count toward the number of enemies required to pass the level. As the name implies, they are only found on their particular level.
Wall Bombs
Floor Found: Vaccine Warehouse
Wall Bombs are stationary laser-tripped bombs placed in sets of one to three along the tighter and more congested corridors connecting hallways. Running through the laser will trigger them, though the drones and security robots know how to avoid them easily.
Shooting a wall bomb will disarm it. However, hitting one while an enemy passes through it will cause it to damage them as it disarms.
Test-Tube Zombies
Floor Found: Research and Development

Given the sheer amount of these things littering the laboratory, lord only knows what vaccine they are working on or if we are destroying the umbrella corporation. Regardless, it is better not to wake them.
The zombies will not cause you any issues unless the tube they are sleeping in is shot twice. Then it will shatter, releasing the zombie, who will immediately start to shamble in your direction. They take a lot of damage, and as one would expect with zombies, the best strategy is to aim for the head repeatedly.
Security Cameras
Floor Found: Executive Power

You will know a security camera is near thanks to the soft noise it will make, which can be heard directly through walls and around corridors. The cameras are stationed up near the top of the wall and can easily be missed in the heat of the moment.
These cameras will not only let out a loud noise and alert the enemies in the room to your presence, but they will also start to first pistol bolts at you. One shot will both silence them and disable their turret.
Non-Boss Enemies
Related Unlock: Getting at least silver on every non-boss enemy’s trophy will unlock the Sonic Pulse Generator.
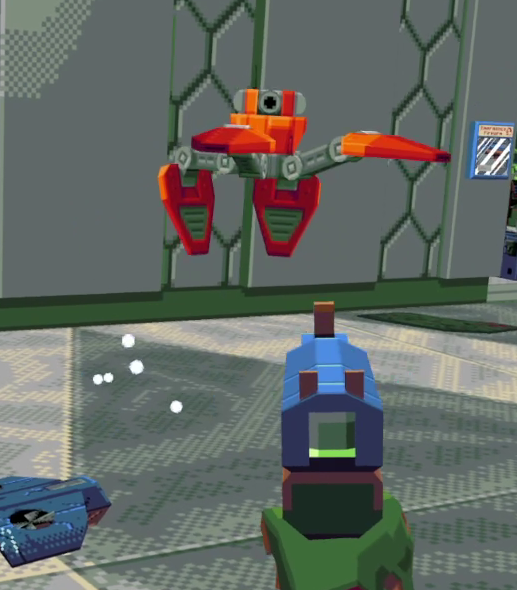
Drones
Related Unlock: Killing 30 unlocks the Blast Pistol.
Level Found: Underground Sewers

Drones act as air-bound guns. They are flighty and zig-zag around as they hurry to find the closest vantage point. Consequently, they are one of the quickest enemies, if not the fastest of them all. Therefore, they should be handled immediately as, otherwise, they will be the first to attempt to flank you.
Thankfully, they are the easiest to kill as a shot landed anywhere on their tiny bodies will generally down them.
Blue: Slow firing rate like a pistol.
Purple: Rapid firing rate like an SMG.
Green: Hunt you down and attempt to blow up near you. They have a large burst radius. The first shot will bounce them back, and the second will make them detonate. Try to take them out the moment you see them, as they will have a higher chance of enemies being in their blast radius. Otherwise, try to herd them closer to a larger group of enemies to take a large group out. This is only advised if you see an opening.
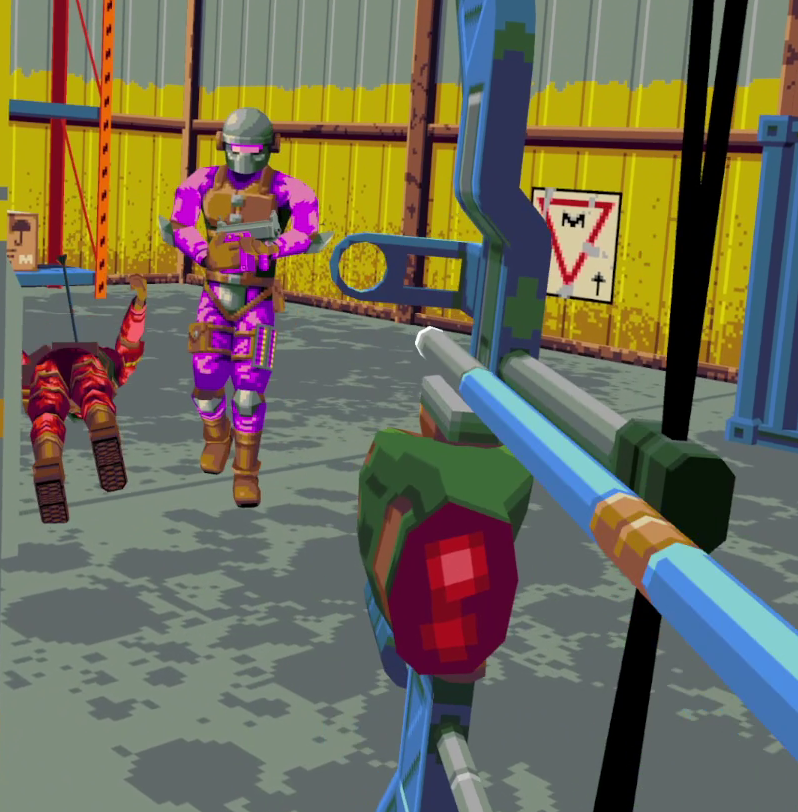
Lesser Guards
Related Unlock: Killing 50 unlocks the assault rifle.
Floor First Found: Underground Sewers
Crit Spot: Headshots

The second-lowest on the totem pole, a guard usually takes one to the head or two to three to the chest to take them down. These are not stormtroopers, though. Their aim is actually on point; their bullets being slowed is what screws them over. All lesser guards are generally easy to avoid and dodge, but they are rather perceptive when using cover.
They will aim right where your head will pop out, leaving a horrible shock from a bullet round to the face. SO, when peeking out from cover, be sure to duck or stand based on how they last saw you.
Blue: The weakest and easiest to manage. They only carry a pistol.
Purple: They are a more significant pain, but ducking and weaving will still keep their bullets away from you.
Red: The most annoying of the bunch. They are equipped with a shotgun, which will fill the air with projectiles making the bullet dodge dance harder to pull off.
Elite Soldiers
Related Unlock: Killing 50 unlocks the Laser Pistol.
Floor First Found: Chemical Processing
Crit Spot: Head Shots

These enemies are equipped almost exactly like the Lesser Guards. However, unlike the Guards, the Soldiers have been decked out with armor. They will take an extra headshot or two or more peppering to the body, but they otherwise require the same tactics. As you progress from the lower levels, Soldiers will gradually become replaced with more guards.
Security Robot
Related Unlock: Killing 30 unlocks the Rocket Launcher.
Floor First Found: Reception and Sales
Crit Spot: The two camera eyeballs, one positioned on either side of their face. Shoot the adorable eyes.

Thanks to how close they are to the ground, the security robots are most dangerous. The tiny little devils are slow but can tank plenty of bullets to make up for it. These guys should always be targeted first. They are an absolute pain, have a rapid enough fire rate to make the bullet dance of survival more complex, and are quick to readjust their aim once you settle for even a second.
Kani Bot
Related Unlock: Killing 25 unlocks the Sticky Launcher
Floor First Found: Reception and Sales
Kani Bots are tiny, quick, and initially hide behind a shield. When their guard is up, they will fire pistol shots at you. Then, they will drop their protection and jump at you when they get close enough. After a few brief moments, if you aren’t close enough for another strike, they will raise their shield and either readjust or fire at you while advancing.
It is best to dodge their shots while they draw near and wait for them to lower their shields. Then, start firing as they prepare to leap at you while circling them. They will jump in a straight arc, allowing you to pepper them with bullets on that arc or once they land.
Stalkers
Related Unlock: Killing 30 unlocks the laser rifle.
Floor First Found: Chemical Processing

While out of the non-boss enemies, Stalkers can tank the most blows, they are the slowest and loudest. However, you will be able to prepare for them thanks to their loud affirmation that a hallway is safe and yelling out for the room to be alerted once they notice you.
It is best to put as much distance between you and them and put something between their line of sight, allowing you to kill off any additional enemies until you can focus your fire on them. All the other enemies will circle around the door you are using for cover long before the stalker reaches you.
Don’t forget about them, though. They aren’t called Stalkers because they forget about their targets.
Blue: Dual Turrets.
Orange: A rail gun; it takes the orange stalker a moment to activate and fire its shot. You will know its path by the laser it shines, stay out of its way to not get blown to bits.
Bosses
A level’s boss will only appear on the second floor. Instead, they will appear on your wrist-mounted map as a red circle in one of the rooms. If they get alerted to your presence, they will follow after you, and some will even hunt you down.
The Accountant
Related Unlock: Killing him 5 times unlocks the Bouncer Shotgun.
Floor Found: Profit Management

Unlike every other enemy in the game, The Accountant has a projected shield. This shield will take a LOT of damage, but he otherwise isn’t too tricky. Simply take cover and keep blasting at his shield until it shuts down. Then one blast to the head should do it.
Spider-Drone
Floor Found: Chemical Processing

This might be because I am arachnophobic, but this boss is the one that unnerves me. Next to the helicopter, it is the biggest of the crew. It also will blow your view of other enemies behind him. Still, those enemies will have a chance of hitting you from around the skittering spider.
The spider drone fires easily dodged rockets, but those rockets can hit something behind you as you swerve if you don’t account for your environment, exploding and causing you to be harmed by a dodged rocket. How embarrassing.
Dr. A. Morral
Related Unlock: Killing him 3 times unlocks the Revolver.
Floor Found: Research and Development.

After the Spider-drone, Dr. A. Morral is a bit of a chump. He has to get in a stance to fire at you, so the strategy of just retracing your path of destruction and shooting him in the head as you flee will down him in no time. Just be mindful of any zombies he or any enemies you haven’t killed yet might free.
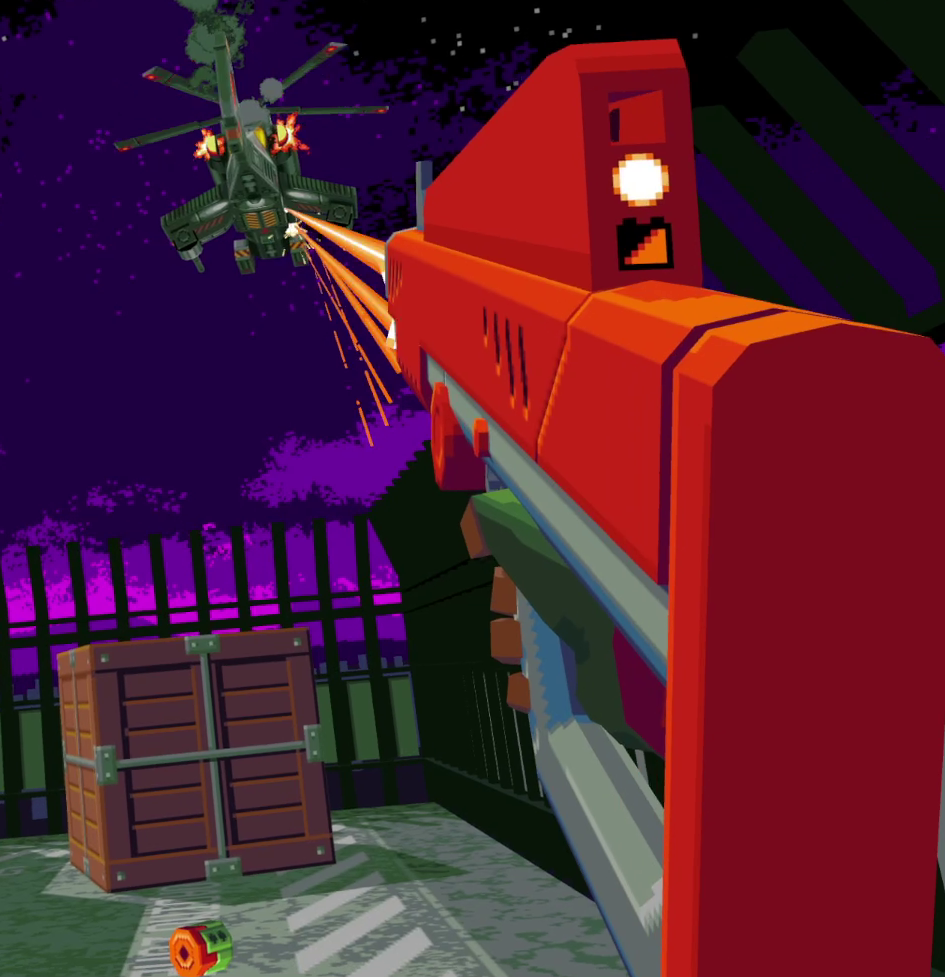
C.E.O. Helicopter
Related Unlock: Challenge Mode
Floor Found: High Worth Individual
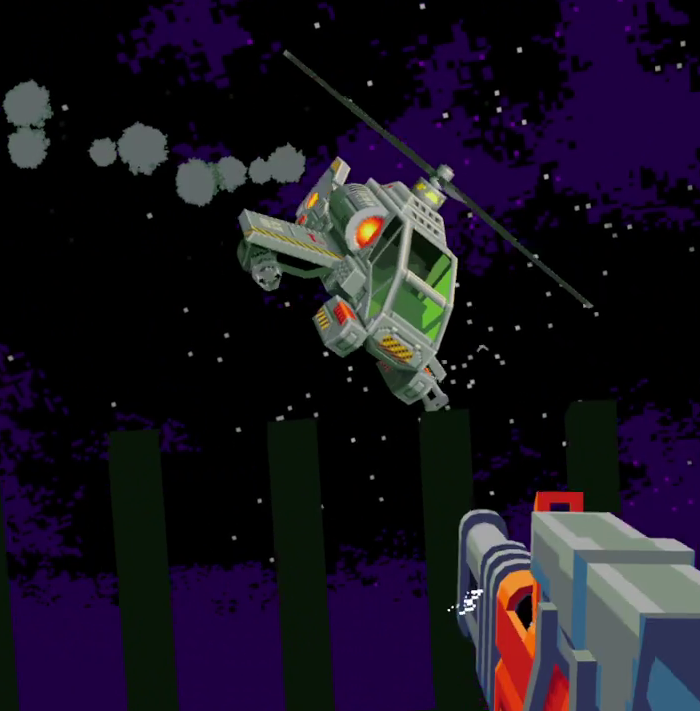
We’re finally here, at the top of the tower and the rainbow’s end. The H.W.I. seems to have heard us coming. It was probably all the gunfire. Luckily, it seems they were a very giving boss, as Ammo Vendors will pump out ammunition based on the guns you carried into this fight.
You will need to quickly put some cover between you and the helicopter once it finds its position in the air. Its turrets are deadly and will rapidly chip away at your life if you are careful. Keep shooting him, and he will eventually change position, trying to carpet bomb you with gas the entire time.
Their area of effect will be limited, but they will ruin you if you let yourself be surrounded by them when they go off. You have a brief window to escape their green grasps, however. So, once you see the helicopter sweeping over the center of the map, quickly run perpendicular to them to avoid it. Then, find a new bit of cover between you and the chopper and keep firing.
At two or more points during the battle, the C.E.O will release a wave of enemies to try and deal with you while he moves temporarily out of view. These enemies are potential godsends, as they have a chance of dropping health items should the helicopter have ruined your day. Once the wave is clear, find cover again and fire at the C.E.O. helicopter until it crashes into the roof.
You did it! The C.E.O. Helicopter marks the end of a run.
Difficulty-Exclusive Bosses
Booster Bruce
Floor Found: Vaccine Warehouse (Medium Only)

While Bruce has high marks for looks, he isn’t the most dangerous boss on this list. Instead, he is relatively easy should you clear any additional enemies that might join his fight before you take him on.
Bruce will fly around the room and follow after you once he is alerted to your presence. Aim for his helmet or backpack and dodge his slow-moving rockets while keeping in mind your surroundings so that the splash damage of a dodged rocket doesn’t bite you in the butt.
Sewer Rat
Floor Found: Underground Sewers (Hard Only)
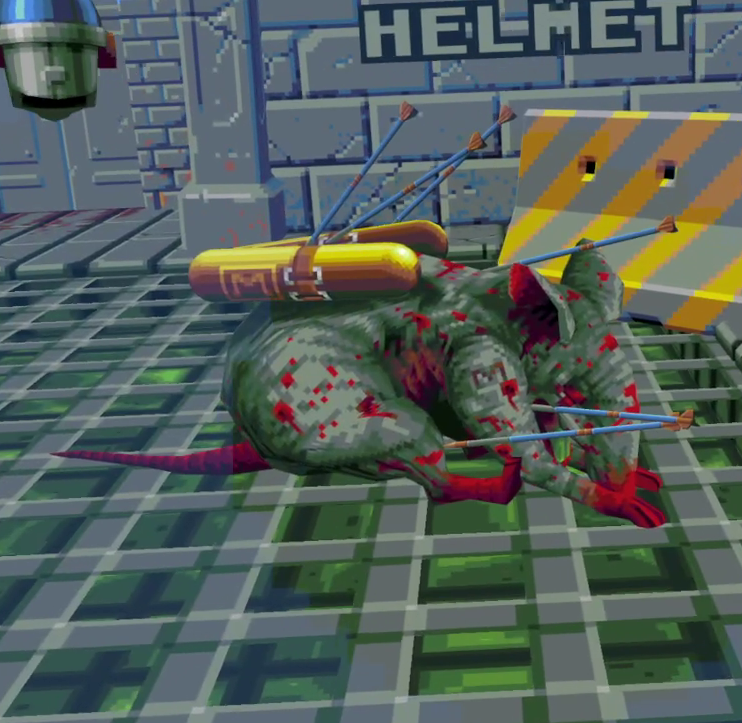
The sewer rat is terrifying and deadly. It will take a lot of shots from even the compound bow. To make matters worse, the sewer rat will start hunting you the moment you move around. It will attack you by slashing at you and spewing a green sludge at you.
So the best strategy is to first note where the sewer rat is on your wrist. Then, face that door and move around without leaving the starting room, drawing the rat to you. If you have something explosive, fire it at the rat as it comes in the door as this will help take care of any friends it takes. Then, circle around it to avoid it spewing its poison at you, and don’t relent until that rat is dead.
FAQ
Question: Where is Compound VR Available? Is Compound VR Available on the Quest 2 Marketplace?
Answer: While there are plans to release Compound Vr to the Quest 2 systems, for the moment, Compound VR is only available on the Steam marketplace.
Question: Is There a Quick way to Unlock all the Weapons and Mutators in Compound VR?
Answer: As of writing this, a save is available that will unlock all the guns and mutators for your save. These achievements are unlocked without gaining the bronze, silver, or gold statues, so you will still be able to work towards your achievements.
Question: Where is my Save for Compound VR Located?
Answer: Your save will be located in the “C:\Users\[your username]\AppData\Local\COMPOUND” folder. The file will be called ‘compound_2.sav.’ If you have trouble locating your AppData folder, try searching for it using ‘%s.’ The % sign surrounding a folder name in the search bar will tell the computer to show the user hidden folders as well. IE: %appdata%.
Conclusion
Well! The armory is complete. The shelves of trophies have had their question marks replaced with glorious golden models, and best of all, a criminal empire is entirely in ruins! That is the smoke and burnt-corpse riddled smell of victory!
There are plenty of compounds to rush up, plenty of mutations to experiment with, and best of all, all this content is just the beginning. The entire game isn’t even out yet, so we will have much more to look forward to. Until then, we have plenty of weapons to mow through countless enemies. Until you get all those gold-gilded statues, there is still another compound to raze.
Have a marvelous one, and thanks for reading. Good luck.

Continue reading:
Best Retro VR Games
Top 10 Best Stand Alone VR Experiences
Is VR Still in its Infancy in 2022?